Last update: 2024-03-02| Negmaster Version: 2.5.1
General
Installation
- Installation
- Manual Installation
- Uninstall
- Updating
- License Deactivation
- Installing optional IT-8 camera profiles (RAW)
- Installing optional IT-8 profiles (Imacon)
Preparing Files
- Preparing Files in Lightroom
- Preparing Files in Bridge / ACR
- Preparing Imacon Files in Lightroom
- Preparing Imacon Files in Bridge / ACR
- Presets
Processing
Post Processing
Exporting Files
Other Topics
Overview
Thank you for purchasing NEGMASTER. Please read these instructions carefully for best results. If you have further questions you can reach me via the contact form or join the NEGMASTER group on Facebook for help from the community.
Negmaster is an extension for Photoshop and can work with any bitmap file Photoshop can open.
When working with raw files from negative scans, the scans must be prepared in either Lightroom or Adobe Camera Raw (ACR). For this, Negmaster offers special camera profiles that ensure that the entire usable dynamic range is available and the color reproduction is as true to color as possible. When applying one of these profiles the image gets inverted. After performing white balance, the result will be a flat positive with linear brightness.
After preparation, the image data is transferred to Photoshop and can be automatically optimized with Negmaster according to your specifications in the converter config panel. After processing an image, the program offers the tools you need to compensate for irregularities or to further optimize the results according to your own taste.
When you have finished editing, the program offers the possibility to save the image data with export presets or to return them to Lightroom with the key combination “ctrl/cmd+S”.
Concept
Negmaster is primarily suitable for converting scanned film negatives, but can also be used for further processing of scanned slides and for optimizing digital photos.
Basically, the program is designed to create a very neutral and flat starting point in order to give the photographer as much freedom as possible in further image processing.
This freedom manifests itself primarily in “open” shadows and highlights. The brightness of the image (gamma) is initially linear and will appear too bright with the default setting. However, the photographer is given the opportunity to adapt all parameters to his use case.
Once these parameters have been set to the user’s taste, he can leave them as they are and should henceforth achieve very good results with very little effort with the same film and scanner. A different setting of the parameters is only necessary if the use case changes significantly.
In addition to the basic function of converting, the user is given tools that simplify the work in Photoshop or make it easier to create the desired image look. In addition to Luts for emulating paper types and MiniLab looks, there are also special tools for correcting or creating color casts, sharpening, dodging and burning and others.
The tools in Negmaster range from processing to saving the results. As a rule, you will not need any functions outside of the plug-in for image processing.
RAW files are recommended as a starting point because we can already influence the image data in the RAW converter. In connection with the supplied camera profiles for scanners and DSLRs, Negmaster utilizes the full dynamic range of the sensor and can calculate the colors of an image without clipping the histogram using an algorithm that was specially programmed to calculate the correct tonal representation of film. Should it be necessary to clip the histogram, e.g. because dust on a negative is a problem, the algorithm will clip as little as possible.
In principle, however, the processing of all file types that Photoshop can open is possible. Although RAW files are recommended, processing TIF or even JPG files can produce excellent results.
It is also possible to process files from exotic or professional scanners. If you have a Noritsu or Imacon scanner, please contact us. I can offer you special profiles for these scanners.
The processing of Pakon .raw files (TLX Client Demo) is possible without further ado, since .raw files are native Photoshop files.
Workflow
The files are prepared in Adobe Camera Raw or Lightroom. The preparation consists of two steps, the first being the assignment of a camera profile. This can be done either by preset or by manual selection from the LR/ACR profile section. Profiles and presets are available for negatives and positives. Negatives are already inverted in this first step. That is what we call “the positive workflow”, what makes it easier to find a correct white balance
The second step is a white balance on the unexposed border of the film. If there is no border, the white balance for negative film should be performed on a “as dark as possible” spot in the scene of the photograph. With slide film, the white balance should be made on a point in the scene that comes closest to neutral gray. Optionally, the automatic white balance feature of LR/ACR can also be used, but it must be ensured that there are no remnants of the light source used for scanning or sprocket holes in the image.
Results true to color are achieved by profiling your scanner. To do this, an IT-8 target must be purchased (Wolf Faust F3 or Kodak Q60). You need to scan this target and send the RAW scan to me (contact form). I can then create a camera profile from it that can be used to prepare your files. The creation of the profiles also works for DSLR. It’s also possible to make IT-8 profiles for TIFF scans and other file formats.
After the preparation, the files are transferred to Photoshop in AdobeRGB 16bit / channel. First you open the “Conversion Config” in Negmaster and convert the image with the default settings. After an initial conversion, you either continue to edit the image by hand or you can estimate which parameters need to be changed in order to best suit your own taste. When these parameters are found, you can either continue picture by picture or convert one or more folders in “Batch Mode“.
Installation
Windows
Since v2.5.0 Negmaster relies on it’s own installers. When coming from earlier version please uninstall with Anastasyi’s Extension manager before proceeding.
- Close Photoshop, Lightroom and Adobe Camera Raw
- Unzip the Negmaster.zip you downloaded
- Install the resulting Negmaster.exe (Windows) or Negmaster.pkg (Mac) via double click
- After installation is finished open Photoshop’s preferences > Plugin tab > ensure the “Load Extension Panels” option is checked.
- In Photoshop go to > Window > Extensions > NEGMASTER
- Enter the serial you received via mail and your email adress. Press “submit”.*
MacOS “non-M1”
- Close Photoshop, Lightroom and Adobe Camera Raw
- Unzip the Negmaster.zip you downloaded
- Right click “open” the resulting Negmaster.pkg (Mac)
- Confirm the the following warning with “open”
- Enter the admin password to allow file transfer to your user folder
- After installation is finished open Photoshop’s preferences > Plugin tab > ensure the “Load Extension Panels” option is checked.
- In Photoshop go to > Window > Extensions > NEGMASTER
- Enter the serial you received via mail and your email adress. Press “submit”.*
MacOS M1
- Close Photoshop Lightroom and Adobe Camera Raw
- In Terminal enter: softwareupdate –install-rosetta
- In Finder: click on Photoshop app > info , click “use Rosetta”
- Unzip Negmaster.zip
- Right click “open” the resulting Negmaster.pkg (Mac)
- Confirm the the following warning with “open”
- Enter the admin password to allow file transfer to your user folder
- After installation is finished open Photoshop’s preferences > Plugin tab > ensure the “Load Extension Panels” option is checked.
- In Photoshop go to > Window > Extensions > NEGMASTER
- Open Adobe Cloud application > open Photoshop in Intel mode. Then in Photoshop: Window > Extensions > NEGMASTER
- Enter the serial you received via mail and your email adress. Press “submit”.*
*Depending on your software and hardware configuration you might have to enter your credentials twice. This is a known bug in Photoshop’s interface.
Manual Installation
There is a manual installation package available from your user account for particular systems where the installer fails for unknown reasons. The issues are most probably related to Mac computers with some sort of security setting issue or missing admin rights.
Make sure your file explorer is sowing hidden system files before you begin. But you can also just copy and paste the file locations (after editing your username) to the adress bar or use “go to…”.
The zip package contains three folders that have to be copied manually to the following locations:
1 – Folder „com.negmaster.negmaster“ goes to location:
Windows – C:/Users/username/Appdata/Roaming/Adobe/CEP/extensions
MacOS – ~/Users/username/Library/Application Support/Adobe/CEP/extensions/
2 – Folder „Negmaster – Scanner Profiles“ goes to the location:
Windows – C:/Users/username/Appdata/Roaming/Adobe/CameraRaw/CameraProfiles/
MacOS – ~/Users/username/Library/Application Support/Adobe/CameraRaw/CameraProfiles/
3 – Folder „Negmaster – Settings“ goes to the location:
Windows – C:/Users/username/Appdata/Roaming/Adobe/CameraRaw/Settings/
MacOS – ~/Users/username/Library/Application Support/Adobe/CameraRaw/Settings/
Uninstall
Windows
Negmaster later or equal version 2.5.0:
- Deactivate your license key
- Select Start , then select Settings > Apps > Apps & features. Or just click the shortcut link at the bottom of this article.
-
Select the Negmaster app you want to remove, and then select Uninstall.
Negmaster earlier versions:
- Deactivate your license key
- Use Anastasyi’s extension manager for uninstalling
Or uninstall manually:
- Make hidden system files visible in Windows Explorer
- Remove all NEGMASTER related folders from the paths below
Extension location:
C:/Users/username/Appdata/Roaming/Adobe/CEP/extensions
Camera Profiles location:
C:/Users/username/Appdata/Roaming/Adobe/CameraRaw/CameraProfiles/
Settings location:
C:/Users/username/Appdata/Roaming/Adobe/CameraRaw/Settings/
Mac
- Deactivate your license key
- Use Anastasiy’s extension manager for uninstalling
Or uninstall manually:
- Make hidden system files visible:
Go to root (the system hard drive). Press Command+Shift+Dot to make hidden system files visible. - Remove all NEGMASTER related folders from these paths:
Extension location:
~/Users/username/Library/Application Support/Adobe/CEP/extensions/
Camera Profiles location:
~/Users/username/Library/Application Support/Adobe/CameraRaw/CameraProfiles/
Settings location:
~/Users/username/Library/Application Support/Adobe/CameraRaw/Settings/
Updating to a newer Version
If the currently installed version of Negmaster on your hard drive is higher or equal 2.5.0, you can use the Mac or Windows Installer to overwrite the previous version.
- The Mac Installer will remove all files of the previous version automatically before copying the new files
- The Windows installer will overwrite existing files. For a clean installation you need to uninstall first
- Both installers won’t remove or deactivate your license key. If you want to deactivate then please follow these instructions
If your current version is below 2.5.0 please uninstall manually before updating.
License key deactivation is not neccessary.
License Deactivation
In case you bought a new computer or if you want to use Negmaster on a different computer, you can deactivate the license and activate it on a different computer.
- Download “Negmaster Deactivator” from your user account
- Install Negmaster Deactivator with the extension manager just like you installed Negmaster
- Start Deactivator in Photoshop from “Window > Extensions > Negmaster Deactivator”
- Enter and submit your credentials twice
- After Deactivator prompt “Deactivation successful” you can install and activate Negmaster on another machine
Installing Optional IT-8 Camera Profiles (RAW)
Optional IT-8 profiles are made available by the Negmaster Community. The profiles are created using an IT-8 target that is sent from member to member. You can find out more about the project in the Negmasters Facebook group. If you want to support the project so that the waiting time for the members can be shortened by buying more IT-8 targets, you can donate via the PayPal donation button below.
Manual installation is recommended to prevent confusion because there is more than one profile for most of the scanners.
IT-8 Profile Manual Installation for Adobe Camera Raw (ACR) and Lightroom Classic CC
- Close Lightroom / ACR
- Unzip the NEGMASTER IT-8 Camera Profiles for Scanners.zip you downloaded from your account
- In the resulting folder find the camera profiles matching your scanner model
- Make sure hidden system folders are visible in Explorer (Windows) or Finder (MacOS)
- Copy the required profiles to the location given below (if the subfolder “imported” doesn’t exist, create it
- Open Lightroom / ACR
- In the profiles section, in the subfolder profiles, you should now find the camera profile “INVERTRUE IT-8“
- In the profiles section, in the subfolder “NEGMASTER – Preparation” , you should now find a profile “INVERTRUE: Negative – Linear IT-8“
- In your presets section you should now find a folder “Negmaster-Preparation (RAW IT-8)” with presets that choose the previously mentioned profiles
Location
MacOS: /Users/[UserName]/Library/Application Support/Adobe/Camera Raw/Camera Profiles/Imported
Windows: C:\Users\[UserName]\AppData\Roaming\Adobe\CameraRaw\CameraProfiles\Imported
Installing Optional IT-8 Profiles (Imacon)
Some scanners don’t work with Vuescan or Silverfast, like Imacon scanners for example. The files from Imacons are .fff files, that can be renamed to .tif. After renaming, they can be opened in Photoshop / Negmaster like any other file.
The problem with tif files from Imacons is, that the manufacturer embeds his own profile for brightness, gamma and contrast. That said, a file from an Imacon scanner is “non-linear” and not neutral. I found a way to “override” the embedded profile. For this a special IT-8 profile is made, that you can use in Adobe Camera Raw for preparing your files. If you want me to make such a profile for your scanner please get in contact.
Manual installation is recommended to prevent confusion because there is more than one profile for most of the scanners.
IT-8 Profile Installation for Imacon in Adobe Camera Raw (ACR)
- Open ACR.
- Head over to “Presets”
- Click on the three small dots in the upper right corner of the profile dialog
- Click on Import Profiles and Presets…
- In the Import dialog box that appears, navigate to the .zip file you downloaded.
- Click Import
- Restart ACR
- You should now see a new preset folder “Negmaster-Preparation (TIF IT-8)” with presets for slides and negatives
- You should find the profiles in the “Negmaster Preparation” profile folder.
IT-8 Profile Installation for Imacon in Lightroom Classic
- Open Lightroom Classic.
- Choose File > Import Develop Profiles and Presets… from the menu bar in the develop module.
- In the Import dialog box that appears, navigate to the .zip file you downloaded.
- Click Import
- Restart Lightroom
- You should now see a new preset folder “Negmaster-Preparation (TIF IT-8)“
- You should find the profiles in the “Negmaster Preparation” profile folder.
IT-8 Profile Manual Installation for Imacon
Make sure hidden system folders are visible in Explorer (Windows) or Finder (MacOS)
- Close Lightroom / ACR
- Unzip the .zip file you downloaded from your account
- Copy the required profiles and presets to the location given below
- Open Lightroom / ACR
- You should now see a new preset folder “Negmaster-Preparation (TIF IT-8)“
- You should find the profiles in the “Negmaster Preparation” profile folder.
Location
MacOS: /Users/[UserName]/Library/Application Support/Adobe/Camera Raw/ImportedSettings
Windows: C:\Users\[UserName]\AppData\Roaming\Adobe\CameraRaw\CameraProfiles\ImportedSettings
Preparation in Lightroom
For best results, the image should be handed over to Photoshop as a 16bit/channel (48bit) Tiff without compression in color space Adobe RGB.
- Select all shots of the same scene in the develop module
- There are presets that were installed together with Negmaster, each of them is explained below.
- After choosing a preset, use the eyedropper tool to set the white balance on the edge of the film.
- Make sure no color information gets lost by pixels exceeding the histogram (except fim border / sprocket holes). Otherwise adjust exposure.
- Right click on one of the thumbnails to open the whole scene in Photoshop.
- Please render the image to PS as “normal” background layer and not as smart object. Some functions won’t work with smart objects.
Preparation in Adobe Bridge & Camera RAW
- From Bridge, open all shots of the same scene in Camera Raw
- Make sure the raw converter transforms the color space to AdobeRGB
- Select all frames by pressing ctrl/cmd+a
- There are presets that were installed with Negmaster
- After choosing a preset of your liking, use the eyedropper tool to set the white balance on the edge of the film.
- Make sure no color information gets lost by pixels exceeding the histogram (except fim border / sprocket holes). Otherwise adjust exposure.
- Click on “Done” if you want to prepare the next scene, otherwise you can now click on “open” to open the whole scene in Photoshop.
- Please render the image to PS as “normal” background layer and not as smart object. Some functions won’t work with smart objects.
-
Preparing Imacon Files in Lightroom
Please rename the .fff files from FlexColor to .tif before importing to Lightroom. Hasselblad FFF files created by the Hasselblad Phocus software and 3FR files should work without renaming.
- Make sure Lightroom transforms the color space to AdobeRGB 16bit/channel when handing the image over to Photoshop
- Select all frames of the same scene
- If you’ve got an IT-8 profile for your Imacon scanner please assign it now via preset or by manually choosing a profile
- If you don’t have an IT-8 profile, use the preset “Profile: Negative (Non-Raw)” for negative film or use the embedded profile for slide film
- Use the eyedropper tool to set the white balance on the edge of the negative film. For slide film pick a spot that should appear as neutral gray.
- Make sure no color information gets lost by pixels exceeding the histogram (except fim border / sprocket holes). Otherwise adjust exposure.
- Right-click on one of the selected images
- In the context-menu click on “open in Photoshop” to open the whole scene in Photoshop.
- Please render the images to PS as “normal” background layer and not as smart objects. Some functions won’t work with smart objects.
Preparing Imacon Files in Bridge & Camera Raw
Please rename the .fff files from FlexColor to .tif. Don’t open Imacon files directly from Finder/Explorer in PS. Instead, please use Adobe Bridge. Hasselblad FFF files created by the Hasselblad Phocus software and 3FR files should work right away without renaming.
- From Bridge, open all shots of the same scene in Camera Raw (right click -> open in Camera Raw)
- Make sure the raw converter transforms the color space to AdobeRGB 16bit/Channel
- Select all frames by pressing ctrl/cmd+a
- If you’ve got an IT-8 profile for your Imacon scanner please assign it now via preset or by manually choosing a profile
- If you don’t have an IT-8 profile, use the preset “Profile: Negative (Non-Raw)” for negative film or use the embedded profile for slide film
- Use the eyedropper tool to set the white balance on the edge of the negative film. For slide film pick a spot that should appear as neutral gray.
- Make sure no color information gets lost by pixels exceeding the histogram (except fim border / sprocket holes). Otherwise adjust exposure.
- Click on “Done” if you want to prepare the next scene, otherwise you can now click on “open” to open the whole scene in Photoshop.
- Please render the images to PS as “normal” background layer and not as smart objects. Some functions won’t work with smart objects.
Presets
Depending on your device used for scanning, file type and which optional profiles are installed, certain preset folders will show:
NEGMASTER – Preparation (Embedded) | Presets for embedded profiles of non-raw files and raw files
NEGMASTER – Preparation (DSLR RAW) | Presets for standard Invertrue camera profiles for DSLR raw files
NEGMASTER – Preparation (Scanner RAW) | Presets for standard Invertrue camera profiles for scanner raw files
NEGMASTER – Preparation (RAW IT-8) | Presets for optional Invertrue IT-8 camera profiles for raw files
NEGMASTER – Preparation (TIF IT-8) | Presets for optional Invertrue IT-8 camera profiles for Imacon and other “exotic” files
If no additional IT-8 profiles are installed and you are editing a raw file the following folder will show
Negmaster – Preparation (Scanner RAW) or (DSLR RAW)
Profile: Negative – Default | This is the standard inversion profile
Profile: Negative – Flat | An inversion profile for more flat results with slightly reduced contrast and saturation
Profile: Negative – Saturated | An inversion profile for bolder results with slightly increased contrast and saturation
Profile: Slide- Linear | Standard linear profile without inversion
If optional IT-8 Profiles are installed a second folder will show
Negmaster – Preparation (RAW IT-8)
Profile: Negative – Linear Brightness IT-8 | Applies the IT-8 camera profile and the profile for inverting
Profile: Slide- Linear Brightness IT-8 | Applies the IT-8 camera profile only
Profile: Slide- Linear Brightness IT-8 Process 2010 | Applies the IT-8 camera profile only. Enables brightness slider. Different rendering method.
If optional IT-8 Profiles for Imacon or other “exotic” scanners are installed, that don’t have RAW support
Negmaster – Preparation (TIF IT-8)
Profile: Negative -Imacon IT-8 | Applies an inverted IT-8 profile
Profile: Slide- Imacon IT-8 | Applies the IT-8 profile only
If a camera profile for your device is missing or you are editing non-raw files only this folder will show up
Negmaster – Preparation (Embedded)
Profile: Negative – Non Raw | A preset that selects the inversion profile for non raw files or raw files missing a Negmaster Invertrue profile
Short Instructions
Although the program itself is working quite intuitively and has tooltips for all functions, some preparations should be made for best results:
- Scan your negative as raw 16bit/channel
- Set your source color space in Camera Raw or Lightrom to AdobeRGB
- Set your working color space in Photoshop to AdobeRGB
- The installer installed presets and profiles in ACR / LR for preparation of your files for Negmaster. Please use a preset according to the type of film / file you wnat to convert
- Set white balance on the edge of the film or on an area which you want to appear as neutral.
The actual processing is straight forward:
- Open the image in Photoshop
- Press the “PROCESS” button to reveal two buttons under it.
- Press the right button to process the image or press the left button to load the converter config panel.
- When starting Negmaster for the first time click “Set defaults”
- If you want to invert with film border, remove it first by using the crop tool with “Delete Cropped Pixels” turned off (unchecked). Or use the “Auto Border” slider in converter config. Make sure “Auto Reveal” is checked for revealing the border again after processing
- Hit “Process Image”
If you wish you can edit the image further with the tools NEGMASTER offers and finally export the result with the export presets or just give it back to Lightroom via “ctrl/cmd+s”.
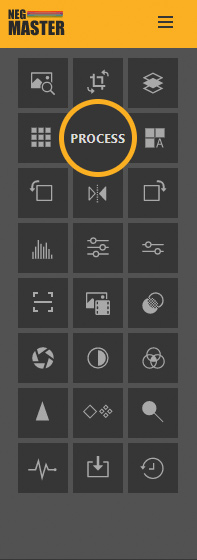
The Main Interface
The main interface provides quick access to the most commonly needed functions for converting and retouching analog photographs.
The idea is that you first configure and save the conversion to your taste in the converter config panel , and from then on you can convert consistently from the main interface using this configuration.
Hover your mouse over the icons to see a description of the functions.
Dust removal: Use this option to create an empty layer and select the spot healing tool. Underneath that layer a duplicate pixel layer is created that is filtered by Photoshops’s dust and scratch removal function. The function tries to remove fine dust by calculating the values for the filter dependent on the image size. It can happen that it removes details in the image. By painting on the layer mask with a black brush you can hide these unwanted effect.
Crop tool: Shortcut to selecting Photoshop’s crop tool. Use it for simple cropping or in case you are converting an image with film rebate, use it to crop away the rebate / sprocket holes. When “Auto Reveal” in the converter panel is activated, the border will be revealed again after converting the image.
Before / After: Switches visibility of all layers off and on again.
ColorCom: Opens the ColorCom panel. A tool for tonal correction. It works similar to an enlarger.
Process: Reveals the buttons for opening the conversion config panel and starting the conversion according to the settings in the conversion panel. The yellow ring shows that settings in the conversion config are active. While conversion is running it wil turn into a spinning animation. Will show warnings in case White Balance is low, when a non-raw file was converted or when a not recommended camera profile was used in preparation.
Auto Gray: Will create a correction layer that tries to remove any color cast by shifting the RGB channels.
Rotate left: Rotates the canvas counter clockwise
Flip Canvas: Mirrors the canvas on the vertical axis
Rotate right: Rotates the canvas clockwise
Levels Adjustment: Creates a levels correction layer. Useful for making a gamma or black and white point correction.
Color Balance: Creates a color balance correction layer. Useful for correcting or creating color casts
Vibrance/ Saturation: Creates a vibrance/saturation layer
Scanner Emulation: Opens the panel with buttons for scanner / minilab emulation profiles
Paper Emulation: Opens the panel with buttons for darkroom paper emulation profiles
Style Emulation: Opens a panel with buttons for various style emulation profiles
Camera Raw Filter: Creates a smart object from all layers and opens it in the camera raw filter
Contrast Adjustment: Opens a Panel with buttons for various contrast presets
Split Toning: Opens a panel with buttons for various split toning presets
Sharpen High Pass: Uses an image size based algorithm for creating a pixel layer overlay that enhances contrast for the edges in the image while separating them from colors. Default opacity for this layer is 30%.
Enhance Details: Uses an image size based algorithm for creating a pixel layer overlay that enhances micro contrast in the image while separating it from colors. Default opacity for this layer is 50%.
Auto Dodge and Burn: Creates a pixel layer that brightens bright areas and darkens dark areas. Useful for crating depth in the image and a good alternative to global contrast. Default opacity for this layer is 35%.
Run Diagnosis: Runs a special conversion on the current image. When the conversion is done it will show the diagnosis results in a new window.
Export Presets: Opens a panel with buttons for quick exporting the current image in various file types and sizes. The resulting files are saved in a subfolder of their source folder.
Reset image: Undoes all changes made to the image and returns it to it’s state of origin. If pressed accidentally, press ctrl/cmd+z to return to the state before reset.
Burger Menu: Opens a submenu where you can activate dark mode, read the “about” section and open the helper extension
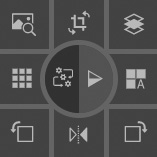
Processes the image according to your configuration
Opens a modal window with configuration options
The Converter Config Panel
The Converter Config Panel is the interface between the user and the algorithm Negmaster uses to convert your images. It consists of range sliders, checkboxes and buttons.
Checkboxes have a gray font and light up yellow when activated by clicking on them. The functions behind checkboxes and are processed after the conversion has been started.
Range sliders have a control range between 0-200 percent in 1 percent steps. The control range is set by dragging one of the round yellow dots with the mouse. The functions behind range sliders are processed after the conversion has been started. An exception is the Auto Border slider, which has a preview function to show the area to be cropped.
The functions behind buttons are triggered immediately.
Point with the mouse on one of the points in the image below to see a description of the functions.
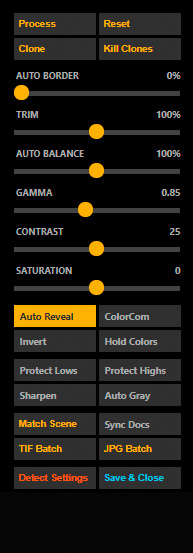
Processes the image with the settings you choose below
Resets the image to it’s state of origin
This range slider crops the image by the given percentage while conversion. It has an inbuilt preview function. Once adjusted it will crop every frame with the same percentage independent from image size. Right click will reset to the default value 0%.
This slider adjusts the strength of trimming of the histogram tails with a custom logic function. It searches for stray pixels on the tails of the histogram. When a significant increase of pixels is detected it will stop trimming. Values over 100% will override the logic what is useful when we have to deal with dust. Right click will reset to default value 100%.
Auto Balance calculates the overall color balance of the image. Slider values up to 100% are only affecting color balance when the overall color of the image is more cool than warm. Values over 100% will override this logic and affect all color casts. Right click will reset to the default value 100%.
Controls the deviation of gamma while converting. In a nutshell, this controls the midtone brightness. Smaller values will make the image appear darker in midtones, while bigger values will make it appear brighter. No change in midtone brightness would be gamma 1. Right click will reset to the default value 0.85.
Controls the contrast added or subtracted on an absolute basis. This is just the standard Photoshop contrast slider translated to Negmaster´s user interface. This was an automatic function in previous versions, but with release of 2.4.0 changed to a generic function because it makes the results more predictable. Right click will reset to the default value 25.
Controls whether saturation is added or subtracted during conversion.
Auto Reveal is useful if you want to convert frames with film borders and sprocket holes. For finding the correct tonal values in a frame we have to hide the sprocket holes from the converter algorithm. This function reveals the border again after conversion.
The ColorCom checkbox automatically opens the ColorCom panel after conversion.
Inverts the image during conversion. Useful for file types that can not be opened in the raw converter or in Lightroom like .raw files from Pakon scanners.
Hold Colors alters the trimming algorithm that is bound to the Auto Trim slider. It will force the converter to keep the overall color mood of an image and will only trim the composite histogram tails. Useful when preparing frames with the NEGSETS
Will detect black pixels after trimming the histogram tails and trigger an HDR function to make the pixels dark gray
Will detect white pixels after trimming the histogram tails and trigger an HDR function to make the pixels light gray
Runs high pass sharpening during conversion
Neutralizes the histogram channels against each other until a maximum amount of gray is reached. Useful for expired film or frames with stray light or negative flaws from wrong development. This function is not recommended as “daily driver” for frames without such flaws.
Matches the color of the current frame to all other open documents. Will create a new pixel layer (“Match Colors”) in blend mode color. Useful for creating absolute consistency for images of the same scene, even if they have flaws that keeps the converter from finding the exact same tonality.
When this checkbox is checked, all open documents will be converted with the settings you made above
Will start a batch process which will convert all files in a given folder with the settings you made above. The output file type will be .tif.
Will start a batch process which will convert all files in a given folder with the settings you made above. The output file type will be .jpg.
Will try to detect the best settings for the current image based on the scanning device and histogram.
Will save the current settings and close the conversion config panel
Will create a clone (copy) of the current document. Useful if you want to compare the results from different conversion settings.
Will close any cloned documents without saving. Useful if you want to quickly close all clones when you found the right settings.
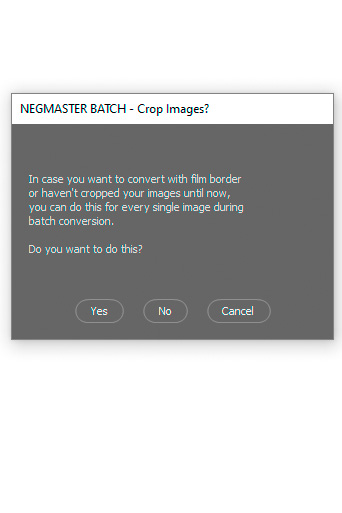
Batch Processing
Batch processing in Negmaster is pretty straight forward. Negmaster will use the conversion settings from the converter config panel for batch conversion.
Pease prepare the images in LR or ACR as described in chapter workflow. This means that the white balance and the assignment of the correct camera profile should already be done.
After clicking on one of the batch options in the converter config panel, Negmaster will ask you if you have already cropped the images and if you prefer a conversion with film border. If you click on “Yes” Negmaster will display a cropping frame for each image during conversion. Make sure that the entire film border is removed when cropping. Pay special attention to the sprocket holdes or other residues of the light source. If there is any of this left, Negmaster will include it in the calculation, which will inevitably lead to strong color casts or a wrong black or white point. Cropping can also be done with the Auto Border option in the conversion config panel, but cropping manually can be more accurate.
Then a file input dialog will open. Select either multipe images while pressing ctrl/cmd and clicking on them or select all images in the folder by pressing ctrl/cmd+A. Then click on “open” and batch conversion will begin.
After the batch processing is finished a confirmation window will open. This will show the file path to the results, which is always located in the source folder of the files, where a subfolder will be created. This folder can then easily be imported to Lightroom.
For the Jpg option the quality is 12/12 and the color space is sRGB 8bit. Tiff is uncompressed 16bit without layers in color space AdobeRGB.
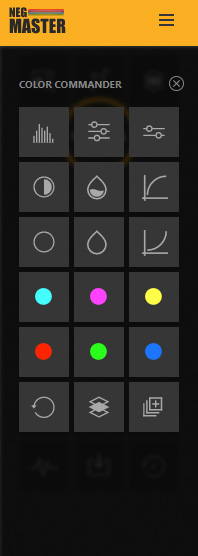
Working with Color Commmander
The tools you need most after conversion
Negmaster ColorCom is used for fast correction after conversion. You can either activate it on the main interface of the program or you can have it called up automatically after each conversion by activating it in the converter configuration.
Most functions are self-explanatory or have tool tips that provide sufficient information about how they work. But some require a detailed explanation. In this case we emulate the operation of a color mixing head of an enlarger. These worked with color filters in cyan, magenta and yellow to filter out color casts. For the beginner it is confusing at first, but as soon as you start working with it, it works intuitively.
Emulating a color mixing head against color casts
Basically, each button moves one of the RGB channels in the direction we want. Taking the complementary colors cyan and red as an example: Both colors are in the red channel. If you move the red channel to the left, red becomes weaker and cyan becomes stronger. This is what happens when we press the cyan button. If we press the red button the red channel shifts to the right and red becomes stronger while cyan becomes weaker.
Suppose we convert an image and ColorCom opens, we examine the image for color casts. Color casts are not always immediately visible, but can be easily detected by comparing the areas of the image that should be neutral to the neutral gray of Photoshop’s working surface. A cyan color cast can often be detected by looking closely at the sky in an image. Does the blue in the sky have a high cyan content? Does the sky appear more saturated than the rest of the image? If so, it should be enough to press the button with the complementary color of cyan once or twice, what is red.
This is how to proceed after each conversion. We look for a color that disturbs us and then compensate it with its complementary color. This is how we used to work with the enlarger. Over time, we get very good and very fast at it, because this function is designed exactly for our needs, whereas Photoshop’s color balance has to be set individually for different brightness ranges, which often leads to unnatural results. Film works differently here than digital photography.
Of course you don’t have to compensate every color cast if you find it beautiful. ColorCom can also be used to create color casts. For example, sepia toning for black and white photography or for moody orange sunlight on the beach in the evening
Creates a levels adjustment layer for adjusting black and white points or gamma either for the composite or every single color channel
Creates a color balance adjustment layer for adjusting color balance in shadows, midtones and highlights
Creates a vibrance/saturation layer for adjusting global saturation or vibrance (desaturated colors getting more saturated as colors already saturated).
Creates a contrast adjustment layer if not existent. Each click will increase contrast by five increments.
Creates a saturation adjustment layer if not existent. Each click will increase saturation by two increments.
Creates a levels adjustment layer if not existent. Each click will increase gamma by .02 increments.
Creates a contrast adjustment layer if not existent. Each click will decrease contrast by five increments.
Creates a saturation adjustment layer if not existent. Each click will decrease saturation by two increments.
Creates a levels adjustment layer if not existent. Each click will decrease gamma by .02 increments.
Creates a channel adjustment layer if not existent. Each click will shift the red color channel more towards cyan.
Creates a channel adjustment layer if not existent. Each click will shift the green color channel more towards magenta.
Creates a channel adjustment layer if not existent. Each click will shift the blue color channel more towards yellow.
Creates a channel adjustment layer if not existent. Each click will shift the red color channel more towards red.
Creates a channel adjustment layer if not existent. Each click will shift the green color channel more towards green.
Creates a channel adjustment layer if not existent. Each click will shift the blue color channel more towards blue.
All values above are stored in a variable. When changing documents the variable should be emptied. This is what the button does. It also removes all existent layers created by ColorCom in the current document.
Before/After: Turns the visiblitiy of ColorCom layers off and on again
Copies all ColorCom layers of the current document to all other open documents
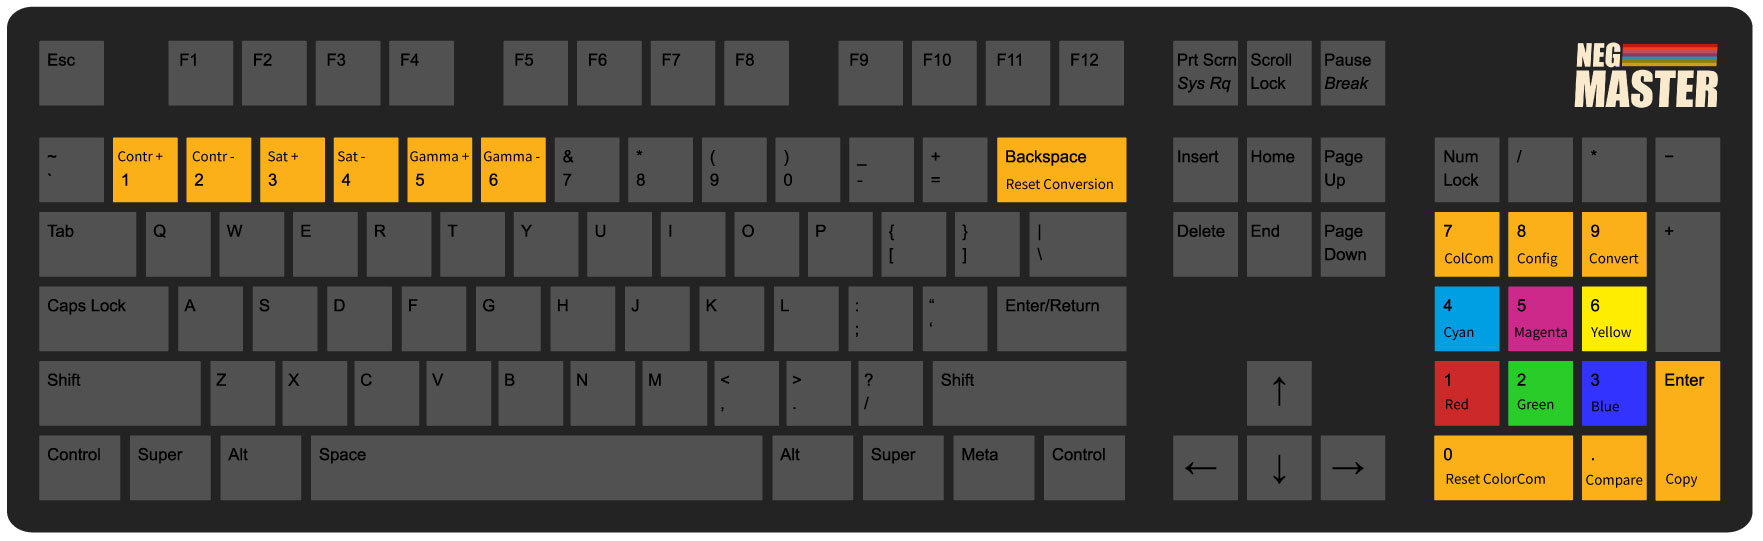
Keyboard Shortcuts
Using shortcut keys in Negmaster can be a time saver.
Once you have internalized the buttons, you can not only convert images quickly, but also correct colors intuitively.
The key assignment is compatible with the inexpensive Contour multimedia controllers, which can be programmed accordingly.
Negmaster works like any other window in Photoshop. For shortcuts to work, Negmaster must be “in focus”. This means that as soon as you click on an item outside of Negmaster, it is no longer in focus and the shortcut keys perform the functions of the other window.
However, once Negmaster is in focus you can use the shortcut keys as you please. For example, you don’t have to open colorcom first to use the color correction keys.
| Key | Result | Key | Result |
| 1 | Contrast + | Num 1 | Shift to red |
| 2 | Contrast – | Num 2 | Shift to green |
| 3 | Saturation + | Num 3 | Shift to blue |
| 4 | Saturation – | Num 4 | Shift to cyan |
| 5 | Gamma + | Num 5 | Shift to magenta |
| 6 | Gamma – | Num 6 | Shift to yellow |
| Backspace | Reset conversion | Num 7 | Call ColorCom |
| Num 8 | Call conversion config | ||
| Num 9 | Start conversion | ||
| Num 0 | Reset ColorCom | ||
| Num , | Compare before / after | ||
| Num Enter | Copy layers to open docs |
File Export
NEGMASTER offers its own functions for exporting the finished files. The functions bypass the dialogs in Photoshop and enable quick saving in common formats. If a file already exists, a duplicate will be created and the current time will be appended to the file name. This is not the case for batch processing, where existing files will be overwritten. The table below shows what the functions do.
| Function | Resolution | Quality | Color Space | Export location | Overwriting |
|---|---|---|---|---|---|
| TIFF | Current | uncompressed | current | source folder/NEGMASTER-TIFF/ | NO |
| JPG | Current | 10/12 | sRGB | source folder/NEGMASTER-JPG/ | NO |
| BATCH TIFF | Current | uncompressed | current | source folder/NEGMASTER-BATCH-TIFF/ | YES |
| BATCH JPG | Current | uncompressed | sRGB | source folder/NEGMASTER-BATCH-JPG/ | YES |
| 1350px longest side | 7/12 | sRGB | source folder/NEGMASTER-INSTAGRAM/ | NO | |
| 2048px longest side | 7/12 | sRGB | source folder/NEGMASTER-FACEBOOK/ | NO |
.
File Formats
NEGMASTER can process any type of file that Photoshop can open. There is no 512 megabyte limit like in Lightroom.
I recommend processing RAW files. Tiff files are not RAW files, but they can produce just as good results as RAW files if white balance was performed correctly while scanning.
JPG Files can also be processed if white balance is correct out of the box, but they lack the dynamic reserves of Tiff or RAW Files.
RAW files are not image but data files. Roughly speaking, these files contain the number of photons per color channel the image sensor has recorded. They have no color space other than the device color space of the camera. For these reasons, you can change the white balance in a relatively huge range without creating a color cast. This is not the case with all other file formats. If you change the white balance there you create a color cast. In RAW files you create a color shift up to a certain limit. Above this limit, parts of the pixels become supersaturated whereas others will begin to produce noise. This is the reason why you should scan with a light source that neutralizes the orange mask of the negative before scanning.
These file extensions indicate that your file is a raw file. Whether you can open the files depends on how current your version of Adobe Camera Raw is:
- Adobe Inc. Digital Negative: .dng
- Canon: .tif, .crw, .cr2, .cr3[4]
- Contax: .raw
- Epson: .erf
- Fujifilm: .raf
- Hasselblad: .3fr, .fff
- Kodak: .dcr, .dcs, .kdc, .raw
- Leica Camera: .raw, .dng, .rwl
- Mamiya: .mef, .mfw, .iiq
- Minolta Raw: .mrw, .mdc
- Nikon: .nef, .nrw
- Olympus: .orf, .ori
- Pakon: .raw
- Panasonic: .raw, .rw2
- Pentax: .pef, .dng
- Phase One: .iiq
- Ricoh: .dng
- Samsung: .srw, .dng
- Sigma: .x3f, dng
- Sinar CaptureShop forMacintosh: .cs1, .cs4, .cs16
- Sony: .arw
Defining the right Color Space
Make sure that your source color space in Camera Raw or Lightroom is AdobeRGB and the color depth is 16bit per channel.
Working with sRGB as source color space can in theory lead to clipping reds and greens. If this is the case, those colors look supersaturated. Use a color space with a wider gamut like AdobeRGB then. So far the only exception are files from Pakon scanners scanned with TLX Client demo, which are limited to sRGB.
Export color spaces are predefined with the export options here.
Helpful links
Changing the working color space in Photoshop
Changing the source color space in Lightroom
Recommendations for Scanning
NEGMASTER wants to bring the colors of film stock onto your screens as they were meant to be. It can save negatives that have been developed incorrectly, but it will also show you whether you have errors in your digital workflow. This will lead to better results in the long run.
Prior conversion NEGMASTER makes use of it’s own camera profiles for raw files. These serve to compensate for contrast generated by Adobe’s standard profiles, which are of no use for us. You can decide for yourself which profiles you like more, but the “invertrue” camera profiles are recommended. During conversion NEGMASTER converts the image into it’s own color working space with a gamma angle, white point and color gamut that is corresponding well to film. These infrastructure was made to have a uniform starting point for all use cases.
These introductory words ask us how you can prepare your negatives to get the best results. As with your work as a photographer, light quality is of paramount importance. Not every light source is suitable for digitizing negatives. The following criteria are important for DSLR-scanning as well as for film scanners:
Scanning with DSLR:
An extensive guide to correctly exposing film with a DSLR can be found in the NEGMASTER Blog.
- Use even Backlights. Evenness is key for finding correct tonality in your negatives.
- Avoid stray light. Use a lens hood and mask out the area around your negs.
- Use “hot light”. It provides full CRI* and GAI* what will lead to correct saturation and tone value distribution.
- Try to compensate the orange mask with your light source as it was done in enlargers.
- If you can’t compensate it with you light source consider using filters in front of your lens. Like an 80a for example.
- When DSLR Scanning, set white balance in Camera on the film border thus it will alter histogram and therefore exposure.
- The more you compensate the orange mask with white balance, the more noise you will get in the blue and green channel (cyan cast).
- Use bright backlights. The brighter, the shorter the shutter times, the better the sharpness.
- Shoot in AV mode without film rebate and sprocket holes to achieve proper exposure for the different densities of every frame.
- Stop your lens down to at least f8 for good corner sharpness.
- Avoid dust. Although NEGMASTER is very tolerant, too much dust can mess up tonal values during conversion. Rough dust and scratches can be removed in Camera Raw Converter or Lightroom prior to conversion.
Important note about white balance with dslr scanning: Try to compensate for the orange mask with your backlight as much as you can. Changing white balance in the raw converter or in camera will result in loss of dynamic range! Camera sensors are working best at around 5000K.
Scanning with a scanner:
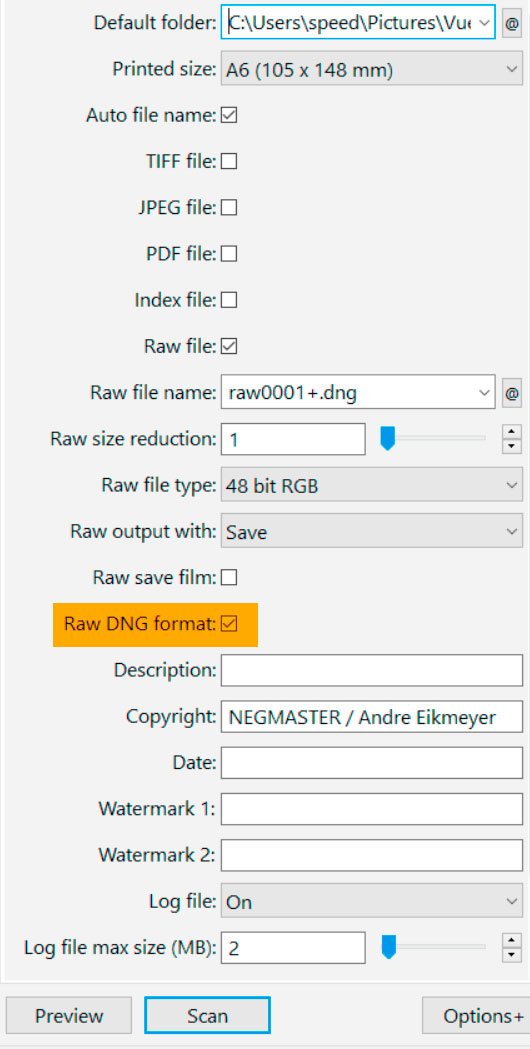
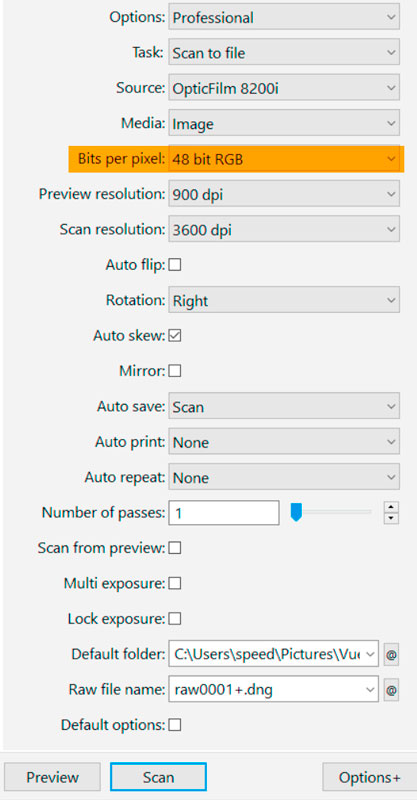
Please understand that i can not give support for third party scanning software. But i can give you some global information for best results. You’ll find the correct settings for Vuescan and Silverfast in the below screenshots
- Scan as Raw DNG. Do not scan as TIF. TIF is rendered RAW data and therefore a bitmap image. A raw file is a pure light data file and it is not an image. There is no “Raw Tif” even when Vuescan says so. We need DNG RAW data. DNG is not always Raw. DNG is a container for different bitmap file formats. Make sure you are scanning as pure RAW DNG as can be seen on screenshots below.
- Input of your scan should be 48bit if your scanner is capable of scanning 16bit per channel, otherwise please choose a value that is closer to the capabilities of your scanner.
- Output of your scan should be 48bit (16bit per channel). Vuescan can bake in the infrared dust removal channel in DNG RAW files. Silverfast can not.
- NEGMASTER provides camera profiles for both, Silverfast and Vuescan*. Until now both programs give very good results when converting with NEGMASTER. In general Vuescan is on the bolder side, whereas Silverfast seems to be more accurate but more flat in color rendition.
*NOTE EPSON V800 SERIES: Vuescan does not work well with these scanners out of the box. Consider profiling the scanner with an IT-8 target or use Silverfast.
Settings for Vuescan and Silverfast


FAQ
GENERAL
What are the minimum system requirements?
Any PC or Mac able to run Photoshop CC will be fine.
Does this work with Photoshop Elements or CS6?
Negmaster requires Photoshop CC. The oldest version reported working is Photoshop CC 2018.
Does this work with Affinity Photo or Photoline 32?
Sorry, not at the moment.
Are updates for free?
Yes they are!
How do i receive updates?
When an update is available you will receive an email with a changelog and download link that leads you to your account on negmaster.com.
CAMERA PROFILES
I can't find the NEGMASTER camera profiles
In Lightroom or Camera Raw click on the four squares right to the profile dropdown menu and it will show all camera profiles installed on your computer.
If you still can’t find the Negmaster profiles and the presets are not showing, the camera profile for your scanning device may be broken or missing. In that case please contact me.
CONVERSION
Why do I get oversaturated reds after conversion?
Please change source color space in ACR or LR to AdobeRGB or ProPhoto.
Make sure you are scanning RAW, not Tif or Jpg.
Vuescan is known for bolder results than Silverfast.
Why do i have dark and oversaturated colors after conversion?
Please make sure you use the Negmaster invertrue profiles in ACR / LR. Make sure you are in a wide gamut source color space like AdobeRGB or ProPhoto.
Why do i get a strong blue or yellow colorcast after conversion?
Make sure you crop away sprocket holes or any other occurence of your backlight. Remove holes in your negatives with the clone tool before conversion. Same for deep scratches or lots of dust.
SCANNING
Which DSLR do you recommend for scanning negatives?
I recommend a Canon or Nikon full frame DSLR with bellows and Apo Rodagon N enlarger lenses as an alternative to expensive modern macro lenses. Sidenote: The “N” in Apo Rodagon N is crucial because it has a much better coating than the non-N version.
Which scanner do you recommend for scanning negatives?
I recommend Plustek film scanners from series 7000 to 8000 with the bundled Version of Silverfast for smaller 35mm archives. If you have a bigger archive or shooting more than two rolls per week i recommend the Reflecta RPS10M with Silverfast. For medium format i recommend scanning with the Epson V700 – 850 and Silverfast. If you are on a low budget i recommend Epson V600/3200/4990 with Silverfast.
LICENSE AND KEYFILE
I can't activate my license
Negmaster product activation requires an internet connection. Please check your firewall / antivirus settings.
I have bought a new machine and want to transfer my license
Transfering license keys is easy. Just download “Negmaster Deactivation” from your account. Install it and deactivate your license key. After that Negmaster can be activated on your new machine.