
Introduction
Proper exposure is essential when scanning film.
It has a direct effect on brightness, gamma and saturation. When scanning multiple images, exposure also affects the consistency of an image series.
This article discusses how to expose slides and negative films in a technically correct way in the context of reproduction scanning. It also gives some background information about how RAW files work. We will only talk about composite brightness and will not touch single channel brightness problems or hue twists in depth, although it is part of the problem when exposing wrong. This will later be explained in another article for keeping things simple for now.
Forget about the Camera Histogram
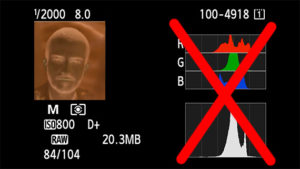
Brightness is not equal to exposure. Exposure is the “amount of photons captured” and brightness is how bright the captured photons appear.
That means exposure relates to the amount of details captured. An underexposed shot has less details in the shadows than a proper exposure. An overexposed shot has less details in the highlights. What brightness does is letting the details appear brighter or darker.
Dynamic range and the Exposure Slider in post Processing
So now you may think your camera can do 14 stops of dynamic range and the sensor is “iso-less”, so it shouldn’t matter how to expose because you can change the exposure in Lightroom later.
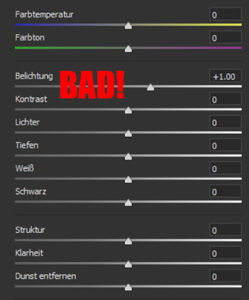
At that point, I’m sorry to tell you that the exposure slider in the RAWconverter is not what it seems to be.
Exposure, as I said, is the amount of light photons captured in a certain period of time. There is nothing that can be changed about that afterwards. What can be changed, however, is an artificial gain via software. We know the artificial amplification as ISO. Strictly speaking, the exposure slider should be called an “ISO slider”.
Actually, this should not be a problem either. Modern DSLRs have enough dynamic range to be able to produce noise-free images even after the subsequent adjustment of two or more aperture stops. But unfortunately the exposure slider behaves differently than we expect, because it affects the highlights in the image more than the shadows. When we scan negative film, this means that we lose detail in the shadows, but at the same time gain hardly any detail in the highlights. With slide film it actually works quite well.
Camera Profiles and linear Brightness
Actually, it is complicated enough now. However, the manufacturers of image processing programs have come up with something to make converting film negatives even more difficult: Camera profiles.
Camera profiles are intended to calibrate the response of the sensor. It is supposed to ensure that colors and contrasts are faithfully reproduced, just as monitor profiles do.
The camera profile is therefore an input profile. A monitor profile or a printer profile is an output profile.
To be able to work color-accurately, all devices in the chain should be profiled.
Most of us also certainly profile our monitor or printer, but work with the standard camera profiles that come with Capture One or Adobe.
There are several problems with this. It starts with the fact that Adobe certainly had a different lens mounted the camera than you when they profiled the sensor. As everyone knows, every lens has a different color rendition. Other than that, Adobe profiled the sensor in standard light situations, while scanning negs with an artificial light source is a totally different thing.
Standard profiles are designed for digital positive photography. Contrast, saturation and white point are matched to an “average taste of the target group”. And that’s not all, because in each camera profile there are two color tables. One for daylight and one for tungsten. When you change the white balance in the raw converter, it interpolates between these two tables. The cooler you set the white balance, the more the tungsten table influences the hues and saturation of the colors. This changes the colors in such a way that they are unevenly saturated, hues shift in a cooler direction. Red becomes magenta, blue becomes cyan and so on.
The problem is that when we scan negatives, we white balance to the edge of the film. This usually shifts the color temperature from about 6000K to about 3000K, which puts us completely in the wrong table because most negative film is daylight balanced.
To get around these problems, Negmaster and Negsets come standard with special linear profiles. Profiles with a linear brightness offer the advantage of being able to reproduce the widest possible dynamic range without clipping the histogram in Lightroom. If you are looking for linear standard profiles without the need of buying programmatic solutions like NEGMASTER, we are offering NEGLIN (untwisted linear camera profiles) and NEGSETS (film profiles based on a linear camera profile).
For best color accuracy, we offer the creation of IT-8 profiles at a reasonable price. The entire camera system including light source and lens will be profiled. And it turns out that where people often talk about the blue cast of the orange mask, it was actually the standard camera profile that was the problem.
How film scanners expose
Surely there are many opinions on how to scan film with a DSLR properly. I will explain a way that is understandable and amazingly simple for everyone.
Basically, it’s about capturing the entire dynamic range of the analog shot without losing details in the highlights or shadows.
This is also how film scanners work. First, a preview is scanned, which can be used to calculate the density range of the film. In simple terms, the density range is the dynamic range between the brightest and darkest points in the image. The exposure time is calculated on the basis of the density range.
Therefore, it is important that no sprocket holes or remnants of the light source are included in the calculation.
When the scan program has determined the data, the fine scan can take place. If the original is very dark, the scanner will scan slower to achieve a longer exposure time. If the original is bright, the scanner will scan faster to achieve a shorter exposure time.
Let’s emulate a Film Scanner with our DSLR
Now that we know how a film scanner software calculates exposure, it’s easy to emulate that with our DSLR. So we need to find an automatic mode on our camera that measures the exposure correctly for us.
Of course, the default setting is to keep the ISO as low as possible to keep the results noise-free. So we manually set the ISO to the lowest setting. Most of the time this is ISO 100.
We also want to manually control the aperture to have the greatest depth of field possible without diffraction. Most of the time this is f8.
So the calculation of the exposure time has to be done automatically. This is done by the AV mode. In order to correctly capture the density range, the AV mode needs a metering mode that can capture both the brightest and the darkest point in the entire image.
For this we select a multi zone metering mode. In some cameras it is also called matrix, evaluative, honeycomb, segment metering…
It is important that the entire content of the viewfinder is measured. And just as with the film scanner, there should be no remnants of the light source or sprocket holes within the measuring range.
If you want to influence exposure on single frames you can easily do that with exposure compensation. A slight overexposure by a half or one stop will result in a lower midtone brightness and slightly crushed shadows, meaning that you’ll get a bit more punchy results.
That was almost it except for one thing.
You should set the white balance in the camera to the film edge before scanning because otherwise one channel may be under- or overexposed. This is especially true for cameras with Foveon sensors.
Some Thoughts about Consistency
Consistency is important. I often read about the recommendation to manually expose when scanning and to scan the whole film with one setting.
I think this is not correct, because you usually have different scenes on one roll. Often you also have deviations in exposure within the same scenes. The method described above compensates for this and ensures that you capture as much detail as possible at all times. Sure, when you messed up exposure with you film camera, you will have to edit more because film can behave weird in terms of color when overexposed more than two stops. Same for underexposure. Hues will twist. That is nothing a proper scan can save although you captured the whole dynamic range.
In support for Negmaster, I see the same problems almost every day. One of them is that negatives are underexposed when scanned. Often simply because the light source is too dark or its color temperature is too warm. Things we’ll get into in another article.
So, that’s it! I hope you enjoyed the article and it gave you some new impulses.